A clean up print on a Gel Press ® plate is a great way to clean off your plate without having to use (non-alcoholic) baby wipes or soap and water. It's fast, easy and fun!!
Today I'm using the 8" x 10" Gel Press ® Plate

Other supplies you will need:
•acrylic paint
•brayer
•stencils and masks
•paper - I used black and yellow
•stamps
•cutting tool
In order for this technique to work and get great results, 2 things are necessary. The paint on your Gel Press ® plate HAS to be dry before you brayer wet paint over it, and should be a contrasting color to the dry layer. It's also important to keep the color of your paper in mind as well.
Now that you understand the basic process, I'm going to show you how to make INTENTIONAL clean up prints!
First, I decided I would use black paper and white paint. I put my 3 tree masks down on the clean
8" x 10" Gel Press ® plate, then brayered white paint on top of the masks. I immediately took the masks off and let the white paint dry. It can be very humid where I live, so I give it plenty of time to dry.
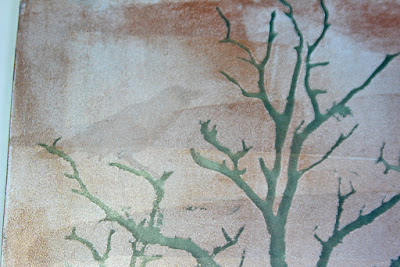
Once the first layer dried, I brayed copper paint on top and added my raven mask (which is hard to see because it was clear). I immediately pressed the black paper to this wet paint. I pressed hard on the paper and plate and gave the paper extra time to soak up ALL the paint.
This is the result. The raven is black because the paper is black.
I wanted to make a card out of this, so I cleaned up around the raven. I cut it to card size and put a round mask over most of the card, painted black around it to give the impression of the moon. Then I used my Trick or Treat stamp. Spooky!
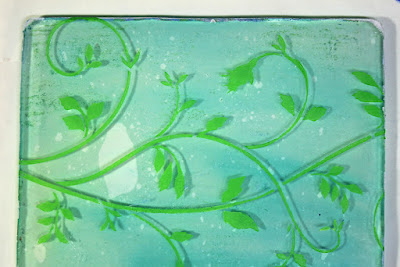
Here's the same technique but with a stencil. I used a large Martha Stewart stencil bigger than the
8" x 10" Gel Press ® plate. I put it down on the clean plate, brayered green paint over it, then lifted the stencil off and let the paint dry.
I was very pleased with the blue - green paint combo. Never be afraid to experiment! All that was left to do was stamp.
Hope you enjoyed this technique! Before you try it out, go check out more cool, creative ideas on our Blog Hop!!
Lea hop here next
Gel Press
Visit us on Facebook - Gel Press® Junkies, Pinterest, YouTube, Gel Press® Blog
Thanks for participating in our HOP!
Kitti Scibelli
Gel Press® Creative Design Team
Visit us on Facebook - Gel Press® Junkies, Pinterest, YouTube, Gel Press® Blog
Thanks for participating in our HOP!
Kitti Scibelli
Gel Press® Creative Design Team


Did you cut your own stencil mask for the butterfly based on the stamp shape? So cool!
ReplyDeleteHi Gail, I did....I confess I use my Brother Scan-n-Cut for all my fussy cutting. Thanks!
Deleteooooohhhh I LOVE how that raven pops against the gel press print! awesome! Will need to try using black paper for a print next!
ReplyDeleteThanks, Sandee....I'm obviously a big fan of contrast!
Deletevery cool - love this technique
ReplyDeleteThanks, Pakrat! And it's easy and fun. :)
DeleteThanks, Lea. The effects with metallic paints are especially interesting.
ReplyDeleteLove it!!!!
ReplyDeleteThanks, Cyndi! :)
DeleteOh = these are gorgeous!!!
ReplyDeleteThank you, Jean! :)
ReplyDelete